
Our journey building a cross-platform app
# Background
Around October of 2019, the idea of creating a health-based web app took hold, and shortly we started developing an MVP to confirm just how viable the idea was. Back then it was actually called Ketobody, and as the name suggests ketogenic diets were the main focus.
The MVP was what we call a "tour", where we ask the user a series of questions about their dieting habits and/or preferences that would be used later to help generate and send a customized meal plan to them as a PDF.
Once we saw how popular it was, we decided to create a separate Members Area (MA). After completing the tour, instead of receiving a PDF, the user would now be sent to the MA, where they would be able to interact with their meal plan, by liking/disliking recipes, replacing recipes, generating a grocery list, and more. Later on, we decided to rebrand the product to a more generic name, Eative, so we could expand our focus outside of keto.
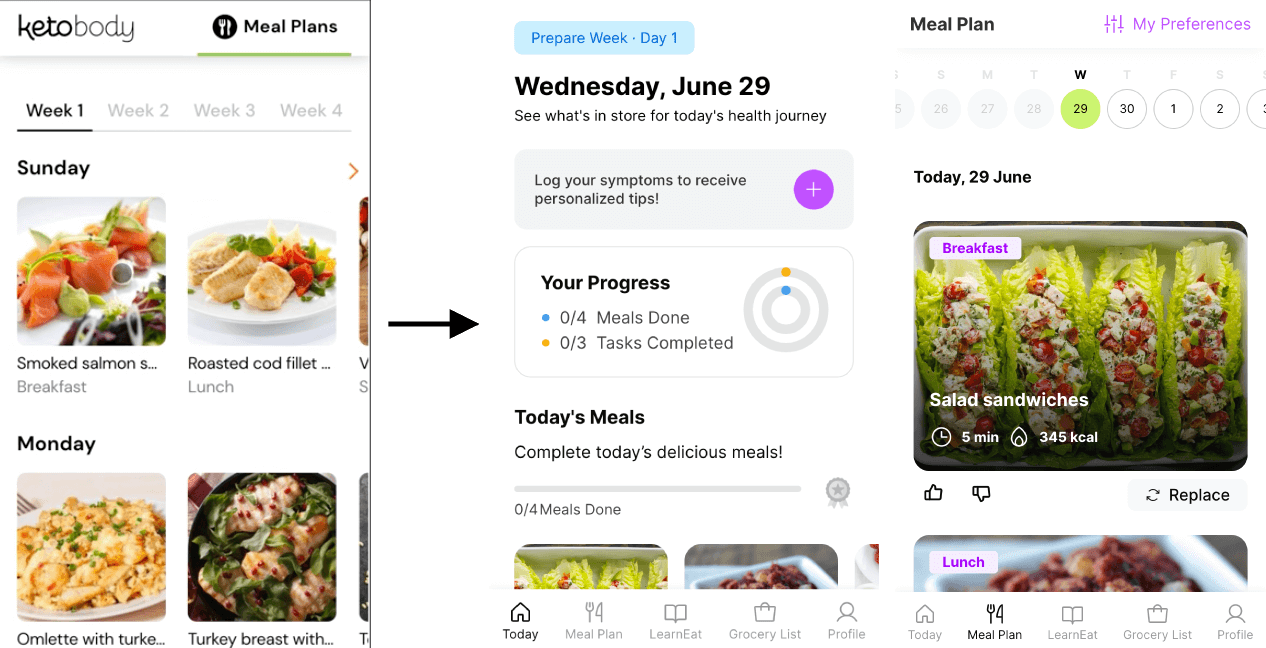 Figure 1: MA transformation from Ketobody to Eative
Around this time, we noticed that a common complaint among our users was the lack of a native app. This quickly led to a discussion about what would be the best way to deliver an app to them.
# Choosing the app type
There were a few important questions we had to ask ourselves before making a decision;
Q. How should we develop the app? Natively? Hybrid..ly?
A. Whichever way is cheapest and fastest, without significantly sacrificing quality.
Q. Should we hire new developers to handle them, or maybe even outsource the work?
A. We were open to hiring new devs.
Q. Should we create an app for both iOS and Android or just one?
A. Although the majority of our users are on iOS, it would be better to have apps for both platforms
Before we explain what we actually chose, let's first list the different options available:
# Native app
These are apps made with one technology specific to a platform. For Android, that would be either Kotlin or Java, while for iOS it would be Swift or Objective-C.
Languages/frameworks: Kotlin/Java, Swift/Objective-C
| Pros | Cons |
|---|---|
| Faster performance thanks to simpler code | Multiple codebases, need to recreate the app for each platform |
| Better offline functionality | Expensive, need specialists who are familiar with the native languages |
| Easy access to device APIs, hardware | |
| Lots of documentation and resources available to help development | |
| More customizable & flexible, particularly if you want different features on different platforms |
# Hybrid app
A hybrid app combines the features of a native app and a web app. You can continue using HTML, CSS, and JavaScript to develop the app UI, which will be displayed inside a Webview (opens new window) in the native device.
Languages/frameworks: Capacitor, PhoneGap/Cordova
| Pros | Cons |
|---|---|
| Single codebase for both web and native app | Slower performance as more features are added |
| Cheaper, no need to hire new devs | Dependency on the framework when it comes to hardware/OS integration |
| Quicker to develop and easier to maintain | Some parts of the code may need to be written twice because of the differences in implementation between the platforms |
# Cross-platform app
These are similar to hybrid apps, but instead of using a Webview to display the app, the web UI components are compiled into actual native elements to give the user a smoother, and more native experience.
Languages/frameworks: React Native, Flutter, NativeScript
| Pros | Cons |
|---|---|
| Single codebase for both web and native app | Dependency on the framework when it comes to hardware/OS integration |
| Cheaper, no need to hire new devs | Some parts of the code may need to be written twice because of the differences in implementation between the platforms |
| Quicker to develop and easier to maintain | |
| UI performance can be comparable to native apps because it is rendered with native solutions |
# Progressive Web App (PWA)
A PWA is a type of app that runs in a web browser, but can be opened from your device like any normal app and has a native feel.
Languages/frameworks: JavaScript
| Pros | Cons |
|---|---|
| Good offline functionality | Poor feature support on iOS |
| Cheap and fast to develop, as it just involves installing a few features to an existing web app | Limited access to hardware/OS features |
| Similar UX to native apps | Can't be uploaded to app store |
| No install, can just add to homescreen from the web app |
With the various options clear and taking the previously mentioned questions in mind, we decide to use Capacitorjs (opens new window) in the end.
# Why Capacitor?
Capacitor is a cross-platform hybrid app framework developed by Ionic as an improved successor to Cordova (opens new window). It provides a simpler interface (bridge) to communicate between the web view and native APIs, allowing you to use the same web code for both platforms, while also allowing you to write separate, custom native code if the need arises.
 Figure 2: Layer communication differences between Cordova (left) vs Capacitor (right)
We chose Capacitor for a few reasons:
- We could easily drop Capacitor into our existing web app and have native apps for each platform running in no time at all
- It saved us time developing new apps for each platform, as we maintain one codebase for each
- Saved us money, because there was no need to hire new developers
- Easy access to native hardware/OS API
- Customizable native functionality, if we want different features on each platform
- Great UI performance despite the use of a webview
If you scroll back up, you can see that by using Capacitor we managed to get pros from multiple options without all the cons. The main cons being that we are still dependent on the framework or external libraries for hardware/OS features, and that it's a newer tool, so the community and documentation isn't as robust as it is for native languages or the more established hybrid app frameworks.
# Initializing Capacitor
Setting up Capacitor is quite straightforward. You should start by first downloading and setting up the IDEs for each platform you plan on developing with (Android = Android Studio, iOS = Xcode).
Then from the root of your app, you simply need to run the following commands:
- Install the core package and CLI:
npm install @capacitor/core
npm install @capacitor/cli --save-dev
- Initialize Capacitor using the CLI questionnaire (creates a Capacitor config file (opens new window)):
npx cap init
- Install and add the desired platform(s) to the project (
device = android || ios):
npm install @capacitor/{device}
npx cap add {device}
- Open the project in the specific IDE:
npx cap open {device}
That's it! You can now start developing for each platform.
# Utilities
Capacitor provides some utility methods to make managing the different platforms a bit easier. The most useful ones are:
- isNativePlatform (opens new window)
- To check whether the app is running on a native platform or not.
- getPlatform (opens new window)
- To get the specific platform the app is running on. Values can be either
web,ios, orandroid.
- To get the specific platform the app is running on. Values can be either
- isPluginAvailable (opens new window)
- To check if a plugin is available on the currently running platform.
# Plugins
Capacitor also provides plenty of official plugins (opens new window) and community plugins (opens new window) that allow you to interact with native APIs. You can see in the screenshot below a list of the available plugins, as well as an example of how to install and initialize a plugin.
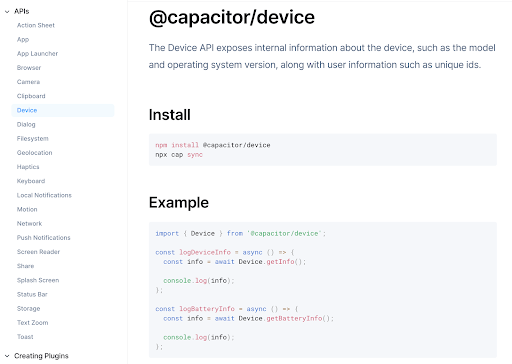
Figure 3: Installing and initializing a Capacitor plugin
TIP
After installing any plugins, you must run npx cap sync, otherwise the plugin won't be properly added to each platform. More info here (opens new window).
# Custom plugins
Capacitor allows you to create custom plugins (opens new window) if you ever have the need to communicate between the web app and native APIs/code. I won't go into too much detail about the specifics of implementing them, because the Capacitor docs provide enough information on how you can do it on both Android (opens new window) and iOS (opens new window).
A use case for custom plugins is for SDK integrations. For example, We're using the RevenueCat (opens new window) service to help us manage in-app subscription payments, so we don't have to develop separate code for each platform's store.
To use this service, we had to individually install the SDK for each platform. Although this means we had double the effort creating the plugins, it gives us more flexibility to customize the native code as we see fit, and we still only need one block of code on the web side, that is capable of sending or receiving data from both platforms without issues.
The first step is creating a method within the plugin class with native code. In the Java example below, we created a setUserId method which takes the userId passed from the web app, and logs the user into Revenuecat via their SDK:
@PluginMethod()
public void setUserId(PluginCall call) {
  String userId = call.getString("userId");

  Purchases.getSharedInstance().logIn(userId, new LogInCallback() {
    @Override
    public void onReceived(@NotNull PurchaserInfo purchaserInfo, boolean created) {
      call.resolve();
    }

    @Override
    public void onError(@NotNull PurchasesError error) {
      call.reject(error.getMessage(), error.getCode().toString());
    }
  });
}
A similar example with Swift:
@objc(PurchasesPlugin)
public class PurchasesPlugin: CAPPlugin {
  private var offering: Purchases.Offering?;

  @objc func setUserId(_ call: CAPPluginCall) {
    let userId = call.getString("userId")?.trimmingCharacters(in: .whitespacesAndNewlines) ?? "";

    Purchases.shared.logIn(userId) { (purchaserInfo, created, error) in
        if let error = error as NSError? {
          call.reject(
            error.localizedDescription,
            error.userInfo[Purchases.ReadableErrorCodeKey] as? String
          );
          return;
        }
    }

    call.resolve();
  }
TIP
The call.resolve() and call.reject() statements above can be used to return data back to the web view if necessary.
Once the plugin classes have been created, you will need to register them with Capacitor, so they can be accessed through the bridge.
Java:
// MainActivity.java

@Override
public void onCreate(Bundle savedInstanceState) {
  super.onCreate(savedInstanceState);
  registerPlugin(PurchasesPlugin.class);
}
Swift:
// PurchasesPlugin.m

#import <Capacitor/Capacitor.h>

CAP_PLUGIN(PurchasesPlugin, "Purchases",
  CAP_PLUGIN_METHOD(setUserId, CAPPluginReturnPromise);
)
And the web code that passes and/or receives the information from the registered plugins.
import { registerPlugin } from '@capacitor/core';

const Purchases = registerPlugin('Purchases');

export const setPurchasesUserId = async (userId) => {
  try {
    await Purchases.setUserId({ userId: String(userId) });
  } catch(e) {
     // handle error
  }
};
You can see that the name of the plugin needs to be passed to the registerPlugin method and that we need to call the same setUserId method from the native classes, which is why it's essential that the plugin names and methods created with Swift and Java are exactly the same.
# Testing
Now that you've created your app, how do you properly test it?
# Manual Testing
An obvious solution to manual testing is to purchase a variety of test devices and test the app through all of them to make sure the user experience is consistent. One problem with this though is with the rise of remote work. In our team in particular, most of the developers are working remotely, and it's impractical for them to come to the office just so they can test the app.
With that in mind we looked into various external testing services, where you can boot up almost any device and test the app remotely.
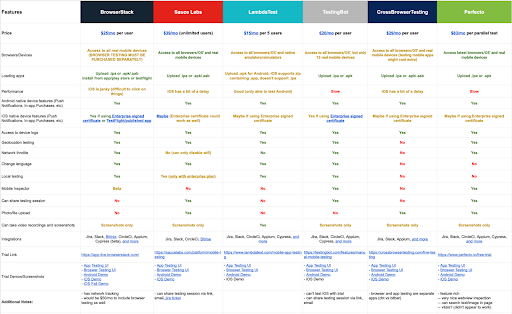
Figure 4: Manual live app testing options (spreadsheet here (opens new window))
In the end we settled with the BrowserStack App Live (opens new window) service. It has the most features, is the most well known and well supported, and is also affordable, and there are multiple ways you can initiate the app, whether by uploading the bundle file directly, connecting to TestFlight, or connecting to the app stores directly.
# Automated Testing
For automated testing, we've installed Appium (opens new window) into our project. It's the most common and well known automation testing tool for native apps, that's known to work for webviews as well.
We did have some issues finding selectors with Appium when first trying it out, as it's usually used to search for native elements, but in the end we were able to solve it by simply adding ids to all the HTML elements we want to test.
# Building and publishing
Next we needed to figure out how we would build the bundles and publish them to the stores.
# Building
Our first question was about whether we would be able to integrate the app building process into our existing CI workflow, which uses CircleCI.
# CircleCI (opens new window) ❌
The first obvious answer was to check if we could build the bundles with Circle, and the answer was yes...however, while with Android it was free and easy to set up, for iOS it came with a price, literally. Our current CircleCI plan doesn't include the macOS executor, which is needed to generate an ipa. We would have to upgrade our CircleCI plan to one that supports it, and it wouldn't be cheap.
# Bitrise (opens new window) ❌
With CircleCI on hold, we decided to look into other external services, such as Bitrise. Bitrise looked promising at the start, because it had an appealing UI that would allow you to easily trigger builds by just clicking a button, however we quickly figured out that they didn't have support for Capacitor apps...
# Ionic Appflow (opens new window) ❌
Next we briefly considered Ionic's own deployment product, Appflow, but after talking with their support team, we discovered that it would cost about the same as upgrading our CircleCI plan, so while we would have good integration with Capacitor, the integration into our daily workflow wouldn't be as smooth, so CircleCI would still be a better option.
# GitHub Actions (opens new window) ✅
The last option we wanted to check before we committed to Circle was GitHub Actions. They have a free tier that allows you to run a limited amount of builds each month (enough for our use), and there are existing community actions that you can simply plug into any CircleCI config, which can be triggered on demand.
In the end this is what we went with. We can trigger the builds by just pushing a tag (the same way we trigger web builds), and the generated bundles are automatically uploaded to the Google Play Console and App Store Connect.
# Publishing
Once you have the app bundle and it has been uploaded to the respective store console, you will then have to publish it so users can actually install them on their devices.
The process for both is pretty straightforward and well laid out in their documentation (Google (opens new window), Apple (opens new window)), so I won't list all the steps here. The most essential steps for both however, are to:
- Select the build you want to publish
- Add release notes that users will see in the stores
- Ensure all the product information is correct
- If desired, do any last minute testing using TestFlight (opens new window) (Apple), apk installation (Android), or an internal testing link (both)
- And finally submit it for review
The waiting time for app approvals can vary quite a bit, from a couple of hours to several days. In our experience, Google generally approves the apps quicker than Apple, and they are far less picky about the details of the app submission. Apple is stricter about following their guidelines, and won't hesitate to reject a submission if they sense anything slightly off.
# Problems?
Obviously when technology is involved, nothing ever works out 100% smoothly, so what issues have we encountered during the development of our app?
# iOS cookie expiration
Thanks to ITP 2.1 (opens new window), cookies without an expiry date set are cleared from the webview as soon as the user ends their session (closes the app). Since we use JWT and refresh tokens set in cookies to handle user session authentication, this meant that the user would have to log-in again every time they closed the app.
We had to create a workaround to update the expiry of the cookies so the session wouldn't end, and in the process we found out that the Apple Webview will only allow cookies to be stored for 7 days maximum (reset if the user logs in again), regardless of what you set the expiry value to. So if a user doesn't log in for 7 days consecutively, their cookies will be cleared and they will be logged out.
# Missing GA4 data for iOS
We attempted to install the GA4 SDK with Firebase so we could properly track user data through our app, however for reasons still unknown, we weren't consistently receiving data from iOS devices (there were no issues with Android).
We're still not sure if this was actually an issue with the native SDK, or if something else was going on, but we were able to resolve it by installing GA4 using a Capacitor community plugin.
# Deep links didn't work 100% properly
We found that after following Capacitor's Deep Links guide (opens new window), that it worked well for most cases with some exceptions:
- When the app was killed completely, the deep link would open the app, but not redirect the user to the proper page
- It's difficult to exclude routes that you don't want deep linking to work for on Android. You instead have to add all the links you DO want it to work for to the manifest file. Not very practical
- The deep links didn't work consistently for older Android devices
We found that using a combination of the native deep link implementation and Firebase's dynamic links, we were able to resolve all the issues we encountered.
# Apple Reviews
Nothing specific to note here other than Apple's pickiness when reviewing apps. We've learned it's best to read their guidelines carefully before submitting, and that even then, sometimes something that was approved before may be rejected later under a different reviewer.
--
Despite all this, and although there were some knowledge gaps regarding general best practices while developing and publishing our app, the process has been fairly smooth for us for the most part. It didn't take very long to go from not having an app to having one with Capacitor.
For more detailed info about CapacitorJS, you can check out the docs: https://capacitorjs.com/docs (opens new window)